


Showing posts with label Arranging Art. Show all posts
Showing posts with label Arranging Art. Show all posts
Monday, September 12, 2011

This beautiful bedroom now reflects the taste
of the woman of the house.
This client was new to the home, she married into family of 6
where her new husband had been a widower.
So, much of the style of the room was that of the
previous lady of the house.

BEFORE
There was a lot in the room and we needed to trim it down.
Notice the heavy armoir on the side wall.

AFTER
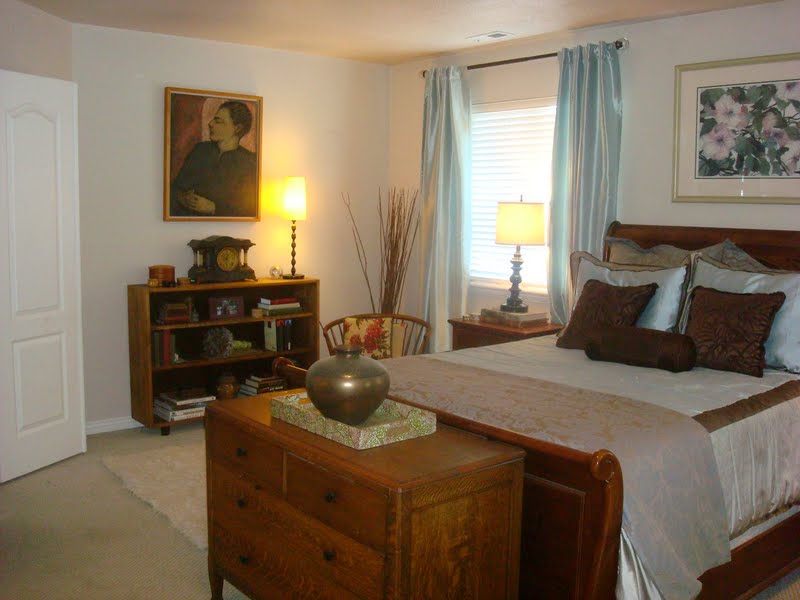
We moved the heavy piece and created a grouping on the wall.
It feels much more to scale and quite warm and inviting.

BEFORE

AFTER
We found out as we tried moving the armoir that it was in three pieces.
Which was perfect, because now we could take the drawer sections
and use them in the closet as a dresser.

BEFORE

AFTER
The art grouping on the wall with the lamp
even out the space and help to create a warm inviting atmosphere.

The newly married couple now have space
to hang some wedding photos.

Notice what a difference the curtains make.

Simple and clean decor.


BEFORE
A different view of the side of the room.
See how the mirrored piece was just to large for the space.
AFTER
The bookcase with the painting feels much better.

BEFORE
Notice the corner by the window.
The dresser that is there feels too tight for the space.
AFTER
See how the taller narrower cabinet works so much better.
Sooo... fun to see the transformation!
Monday, February 8, 2010
Well--- Moving is a BIG job!
I am finally beginning to crawl out of the boxes.
I will be posting pictures of my new place soon, but for now here are a few more photos from a client who downsized and moved to a new place.
 When you move it does not start to feel like home until you can get a few things on the wall. It is so common to have pictures and art propped against the wall for months.
 Your walls can be beautifully painted but feel blank.
 Like this BEFORE shot.
 Even if you take one or two pieces and hang them up ---
it will feel better!
 AFTER
AFTERSee... it really does make a difference. And this is just the hallway!
I am joining in Met Monday over at Between Naps on the Porch.
Go and have a look.
Wednesday, November 4, 2009
 I often get asked how to hang groups of art on a large wall and make it look good.
 Here is one solution---
 Here is the space BEFORE
 AFTER
AFTERSee how this group fills the space nicely.

This is how we did it:
1. First we laid out the art on the floor and experimented with what we liked and then decided to hang the group more random than lined up.
2. We started with the largest piece in the middle, and moved the others around it.
3. We kept the distance between each piece about the same.
See how it feels like a "Unit" rather than a number of framed pieces on the wall.
It creates a nice focal point and you are able to use a few smaller pieces to fill a large space rather than having just one larger scale piece.
Give this a try at your house, it will help to make a cozy room!
I am participating in Transformation Thursday at the Shabby Chic Cottage---go on over and take a look.
Also go and see Melissa's Beautiful Life
Monday, September 28, 2009
 This wall had just been painted a beautiful warm gold, so the BEFORE was a blank wall. I wanted to show you how we created a very inviting arrangement of photos on the wall.
Notice these simple tips:
- All of the these frames are the same style (these are for 8x10 photos)
- The spacing between each of the frames is uniform -- (about 2 inches).
- We created a grouping by adding an ornamental iron rod and a wooden plaque at the top.
So as you look at the wall---you have a pleasing "unit" or grouping. Give this a try next time you are wanting to hang photos.
I am participating in Metamorphasis Monday at Between Naps on the Porch.
Go and see more BEFORE and AFTERS
Thursday, May 14, 2009
 So often when we hang pictures on the wall they get hung
 right in the middle.
I am wanting to share a few other ways to consider.
In this photo there are two pieces hung vertically, and quite close together, but it works well and helps to create a "unit" with the table and accessories.
 Another idea is to hang similar frames in a group so that they have a bigger impact.
 Same idea with the frames on this wall.
bhg
 Here is a BEFORE of a dining room. The black and white pictures on the wall are hung quite far apart as if trying to fill more of the space. But it doesn't quite feel right.
The gold colored art on the left rarely gets any attention because it is just a space that they pass by.
 In this AFTER shot we just exchanged places with the pictures.
Hanging the black and whites vertically on a wall that has less space.
They fit the scale of that wall better.
The larger gold art fills the bigger wall much better and can now be viewed from the family room. The colors tie in very nicely with the dining and family rooms.
 Notice in this BEFORE the wall going up the stairs.
The pictures are spaced quite far apart, as if trying to fill the space.
 In the AFTER we just added one more piece and moved them closer together. See how the space between each picture is about the same.
It feels so much better.
Now go and look around your home and see if you can arrange your pictures to be alittle more interesting, and balanced.
I'm participating in Hooked on Friday's and
I am wanting to share a few other ways to consider.
In this photo there are two pieces hung vertically, and quite close together, but it works well and helps to create a "unit" with the table and accessories.
 Another idea is to hang similar frames in a group so that they have a bigger impact.
 See how the amount of space between the frames is about the same all over.
 Same idea with the frames on this wall.
bhg
 Here is a BEFORE of a dining room. The black and white pictures on the wall are hung quite far apart as if trying to fill more of the space. But it doesn't quite feel right.
The gold colored art on the left rarely gets any attention because it is just a space that they pass by.
 In this AFTER shot we just exchanged places with the pictures.
 Hanging the black and whites vertically on a wall that has less space.
They fit the scale of that wall better.
The larger gold art fills the bigger wall much better and can now be viewed from the family room. The colors tie in very nicely with the dining and family rooms.
 Notice in this BEFORE the wall going up the stairs.
 The pictures are spaced quite far apart, as if trying to fill the space.
 In the AFTER we just added one more piece and moved them closer together. See how the space between each picture is about the same.
It feels so much better.
Now go and look around your home and see if you can arrange your pictures to be alittle more interesting, and balanced.
I'm participating in Hooked on Friday's and
Subscribe to:
Posts (Atom)